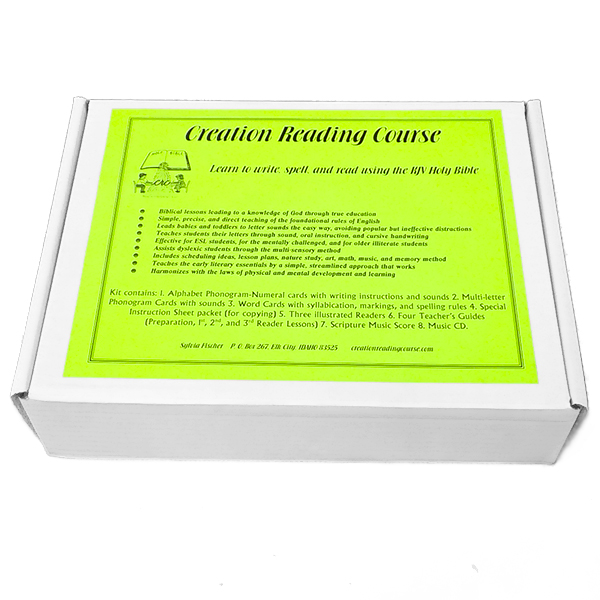
Creation Reading Course Kit
$314.00
The Creation Reading Course Kit is our main product. It teaches the CRC approach to reading. It is packed with information, designed to prevent or solve reading problems. Study the principles, exercises, phonograms, math, handwriting, spelling, and reading. For excellent success, combine it with plenty of practical work, study of the Scriptures, nature science, and history. Start student in Chapter 6 drills, regardless of his age or reading skill. If the student thinks he knows a concept or skill, have him prove it before he takes the next step.
The Creation Reading Course Kit is our main product for this unique approach to reading. Although ungraded, this curriculum covers preschool, kindergarten, and first grade by a different and unique approach. It also teaches principles that most adults never heard. Therefore, the prospective teacher should expect to devote time to study before attempting to teach it. When purchased together as a CRC Kit, you get the best price.
The CRC Kit is packed with information and keeps most parents busy studying for a month or more before they begin teaching, and students are kept busy for 1-5 years, depending on many variables. If the beginning student is a baby, a five-year-old, an eight-year-old, or an older student, it will make a difference. The student’s general health, obedience and cooperation, and natural development, changes things. The regularity, skill, and diligence with which the teacher instructs are very important considerations.
This course is designed to prevent or solve reading problems. The CRC Kit makes it possible to follow the instructions in the Teacher’s Manual and Teacher’s Guides. It contains all the essential principles and many supplies to carry you for at least a year and most often more, when thoroughly taught.
A few minutes scattered throughout the day, with up to a total of one hour daily on the literary-written portion, is about right to make good progress. (Babies need only a minute or two here and there to be taught their oral phonograms as they learn to speak.) The rest of the day should also be well-scheduled to promote a balanced education. A generous amount of time should include training for skill and responsibility in physical practical work. Spiritual culture with promises and prayer, singing, music, math, science with outdoor observation, identification, hands-on nature experiences, Scripture, physiology and hygiene, and history lessons should be added. A resourceful teacher will look for ways to combine many topics together to optimize learning in all areas of good knowledge and useful skills.
Supplementary supplies for drills include games and sand letters. These complimentary materials are not part of the CRC Kit. They are additional, creative drills that support and reinforce the rules taught in the Kit and provide the teacher with more ways to add interest and variety, without neglecting the essentials. When a student is taught this curriculum regularly and with diligence, every student, whatever his age or previous education will be advanced toward self-education.
Several other supplies must be purchased, or found, separately, such as a whiteboard or chalkboard, adjustable height of a roomy table (desk) and chair, good lighting, pencils, markers, chalk, notebooks, paper, eraser, animal pictures, and many common nature and household items.
Keep Instruction in order to prevent confusion. Follow and check off what has been accomplished on the Progress Check Lists. If a student already has the skills taught by an exercise, can show correct samples, and explain the concept when questioned, he only needs to prove it and go forward. If he needs to improve his skill and knowledge in the area, he should begin studying, writing, or drilling right there. This will prevent gaps in his understanding, resulting in frustration. We call this process “evaluation” and “assessment.” We do not have other tests. Competence on the first rung of the literary ladder proves that the student can move forward to the next rung. Competence there, prepares him for the next step.
One CRC Kit can be used to teach a whole class. Extra reader-sets and phonics card sets are recommended for a class of more than three individuals who are all near the same level of understanding and skill. In a family with stair-step ages of children, one set of readers and cards is often sufficient.
For easy lowercase stroking, specifically for the right-handed or specifically for the left-handed, see the Sand Cards for the simplest cursive stroking. The Stroking Cards provide a detailed explanation of how to write each letter with connecting strokes on rounded letters for the more advanced shapes. The oral instructions provide another step toward self-reliant handwriting. This is explained in the chapter, "The Write Way to Spelling" and laid out in a coordinated, step by step method, in the chapter, "Time to Write."
The CRC Kit includes the following 13 components. The items marked with bullets are lists of the constituents included in the above set.
KT-1-01 Piano Music, Song of Creation.
An 8 ½ x 11 inch book with red cover and comb bound. The music score was composed specifically for us by Wayne Hooper. It includes seven songs; one song corresponds to each day of creation week. The songs may also be sung, one at a time, and all together in sequence. They are word for word from the KJV. It is appropriate for a family or children’s choir. A choir is a splendid idea! Printed in a large, easy-to-read format. Suitable for the piano and song leader.
KT-1-02 DVD Music for The Song Of Creation, and the Phonograms.
The Song Of Creation is sung, by Melonie Robanske, and recorded on a 5 x 5 inch DVD. A sound track of piano accompaniment is included with a recording of the Alphabet Phonogram pronunciations. Melonie’s mellow, yet energetic, singing of the majestic song is slow and distinct so that students can easily follow the tune and words, and sing along. Singing Scripture music is the part of the course that aids students in memorizing the chapter.
KT-1-03 A Set of 37 Special Instruction Sheets
The instructive, unbound master pages, 8 ½ x 11 inch, are presented in a plastic slip cover. Copy the desired pages, then punch and bind them in a looseleaf notebook. The Special Instruction Sheets contain dialog outlines, the summary of phonograms, progress check lists, a memory sequence checklist, alphabet charts, weekly plans and records, spelling rules, capitalization and punctuation rules, a marking guide for word analysis, handwriting guides which include slant sheets, clocks, connecting strokes, and more, as listed below.
Pictures are purposely not used in teaching the phonograms or handwriting. The letters themselves are the pictures of the phonograms! The Special Instruction Sheets may be duplicated by the buyer for his/her family or class, as needed. Remember to always preserve a clean master copy of each sheet. Following is the list of sheets.
- S-01 Phonogram Lowercase Alphabet Chart
This chart is in lowercase book print for drilling on saying the alphabet sequentially as a rhyme and as in reading. - S-02 Manuscript Handwriting Alphabet Chart, Capital and Lowercase
Handwritten manuscript letters, in capitals and lowercase– mother and baby manuscript letters. - S-03 Right-handed Cursive Alphabet Chart, Capital and Lowercase
A slanted, handwritten cursive alphabet chart which matches capitals and lowercase letters for the right-handed. - S-04 Left-handed Cursive Alphabet Chart, Capital and Lowercase
A slanted, handwritten cursive alphabet chart which matches capitals and lowercase letters for the left-handed. - S-05 Summary of Phonograms, Alphabet, Basic Multi-letter, Advanced
A chart that summarizes all the phonograms taught in the CRC in three groupings: (1) Alphabet (2) Basic Multi-Letter (3) Advanced. The Alphabet Phonograms should be learned first and most thoroughly with three styles of letters in lowercase–book print, manuscript, and cursive. The Basic Multi-Letter should be learned next in lowercase, (3) and the Advanced last, which are the least used in our language are learned when needed, or a little later. - S-06 14 Capitalization Rules
These fourteen rules are taught whenever a capital letter is needed in writing or reading. Be sure to always tell WHY we need a capital letter, otherwise it is written in lowercase. - S-07 27 Spelling Rules
The 27 Spelling Rules guide us in lawfully combining the English phonograms. Spelling rules are an important guide for correct spelling and analysis of words. - S-08 47 Punctuation Rules
Punctuation rules are taught when the First Reader is begun and ever after. Students deserve to know WHY punctuation is required. These rules go hand-in-hand with the Punctuation Flashcards. - S-09 Word Analysis Marking Guide
Analysis of each spelling word is an effective device whereby students remember how the word is spelled. - S-10 Numeral and Alphabet Phonogram Dialog Outlines
When teaching how to write each and every numeral and alphabet letter, the teacher follows this outline to ensure complete and thorough instruction. - S-11 Multi-Letter Phonogram and Spelling Dialog Outlines
When teaching how to write each and every multi-letter phonogram and spelling word, the teacher follows this outline to ensure complete and thorough instruction. - S-12 First Reader Progress Check List, In The Beginning
Our Primer for the Creation Reading Course begins with no background words. Be careful to keep instruction in order for every student with this Progress Check List. - S-13 Second Reader Progress Check List, From Firmament to Seasons
The Second Reader Progress Check list will lead the student safely along if they did thorough work on the first one. When well taught children are successful and most seem catch on to “how reading works” early during this Reader, if not before. - S-14 Third Reader Progress Check List, Abundantly Blessed
The Third Reader Progress Check List is built on completion of the first two checklists. There are more lessons and phonograms presented on this Checklist, but students have better skills and move right along when well taught. Children agree that the method is easy when kept in order. The Third Reader has a Progress Checklist, a Word List, and a Phonogram list for this last Reader which tells the story of Creation. - S-15 Memory Checklist, Genesis 1- 2:3
This guides memory drills in a manner that helps the student learn the whole passage evenly and effectively. Don’t worry that he will forget the beginning portion while drilling on later portions. Memory drills are the ideal time to focus on meaning and thorough comprehension. - S-16 Weekly Planning Sheet
Bring a balance to your child's education by daily spending half the day in useful work. This is very important. Incorporating as much as possible from each of the four sources of learning on this Planning Sheet in each activity. The more you combine learning by using two or more sources at once, the easier and more coordinated your efforts will be. You can do so without confusing the student. Combine two or more sources in doing an exercise if possible, and sometimes all four can easily be involved. - S-17 Weekly Record Sheet
Keep a record of each student’s accomplishments each week by category. Make color-coded markings of the state-required subjects and show that you are meeting these standards. - S-18 Handwriting Guidelines - Baseline, Upper, and Lower
Show how to place letters and name the guidelines for manuscript or cursive handwriting. This guide sheet applies to both hand orientations. - S-19 Primary Gray Sheet - Landscape
An early guide in the landscape orientation to show how tall, proportionally, all letters should be and how far down the tails hang. The small gray box at the beginning sits on the baseline and is the height that short letters should be. The next higher guideline is how tall the tall letters should be. The first line below the baseline is how long tails should be. It may be used with the vertical manuscript guidelines behind it, and with the slanted cursive guidelines, either right-handed or left-handed. This size is for the earliest handwriting lessons to make stroking and proportions very clear to the student’s mind. Decrease size to the 1st Gray Sheet soon. Gray sheets apply to both hand orientations. - S-20 1st Gray Sheet - Portrait
Use this smaller Gray Sheet in the same way as the Primary Gray Sheet to show the proportional placement and height and tail lengths of letters. This Gray Sheet is sized for the First Reader and for writing on every other line in a Primary sewn notebook. Gray sheets apply to both hand orientations. - S-21 2nd Gray Sheet - Portrait
This is the smallest size that students write for the CRC and beyond. It is the size for writing on every line in the Primary sewn notebook, beginning with the Second Reader. Tall letters should be about 2/3 of the way from the baseline to the upper guideline and tails hang about 1/3 of the way from the baseline to the lower guideline to prevent “tangling” and illegibility. Letters should also be decreased sideways, to maintain their oblique, parallelogram cursive forms. This is the size is our goal before the student’s mental template is set firmly. Take care to use sharp pencils to write in this size. Gray sheets apply to both hand orientations. - S-22 Vertical Guide Sheet - Landscape, Primary
Slip this guide sheet behind the Primary Gray Sheet to write the early manuscript handwriting. Press the Gray sheet page down so that you can see the vertical lines through it. The vertical Guide sheet applies to both hand orientations. - S-23 Vertical Guide Sheet - Portrait
Slip this guide sheet behind the sewn notebook sheet page. It is a faintly-seen guide to keep the downstrokes vertical for early manuscript handwriting. This vertical Guide sheet applies to both hand orientations. - S-24 RH Slant Sheet for Cursive, Primary - Landscape
Slip this guide sheet behind the Primary gray sheet for a faintly-seen guide to follow in writing the large-size beginner’s cursive alphabet letters and numerals. This guide sheet is for right-handed students only. - S-25 LH Slant Sheet for Cursive, Primary - Landscape
Slip this guide sheet behind the Primary sewn notebook page as a faint guide for the left-handed beginner’s cursive handwriting slant. - S-26 RH Slant Sheet for Cursive - Portrait
Slip this guide sheet behind the sewn notebook page as a faint guide for the right-handed cursive handwriting during the handwriting introduction and through the Third Reader, before and after the writing size decreases. - S-27 LH Slant Sheet for Cursive - Portrait
Slip this guide sheet behind the sewn notebook page as a faint guide for the left-handed cursive handwriting during the handwriting introduction and through the Third Reader, before and after the writing size decreases. - S-28 Round Clock for Manuscript - Large
The teacher’s right-handed guide-clock for the front of the classroom. Used for instruction in manuscript stroking directions and shaping for both numerals and letters. Clocks are NOT a sizing guide. - S-29 Round Clocks for Manuscript - Student
Several clocks of various sizes show directions, relations of letter-parts, and shaping. The clock is NOT a sizing tool. It can be visualized in any size, from a tiny clock to a large clock. The size of the clock depends on the application. Sometimes it applies to a curve on a tall letter, like “f” or guides in shaping the tail-curve on letters like “g” or “j.” The clock size depends on the size of writing and the part of the circle needed. Sometimes the size must be larger, as in capital “C” or capital “G,” or smaller as on “e,” “s,” and “m.” These clocks serve both right-handed and left-handed students. - S-30 RH Oblique Clock for Cursive - Large
The teacher’s guide-clock for the front of the classroom for right-handed cursive instruction. Used for cursive stroking directions and shaping for both numerals and letters. It is NOT a sizing guide. For numbers 3 and 8, we visualize 2 clocks, a high-clock above and a low-clock below. - S-31 RH Oblique Clocks for Cursive - Student
The several clocks of various sizes show directions, relations of letter-parts, and shaping. The clock is NOT a sizing tool. It can be visualized in any size, from a tiny clock to a large clock. The size chosen depends on the application. Sometimes it applies to a curve on the tall letter, like “f” and guides in shaping the tail-curve on letters like “j.” The clock size depends on the size of writing and on whether a part if a circle, or the whole circle, is needed. Sometimes the size must be larger, as in capital “C” or capital “G,” or smaller as on “e,” “s,” and “m.” One clock sits above the other, on the slant, for the numerals 3 and 8. These oblique clocks are specifically for the right-handed. - S-32 LH Oblique Clock for Cursive - Large
The teacher’s guide-clock for the front of the classroom for left-handed cursive instruction. Used for cursive stroking directions and shaping for both numerals and letters. It is NOT a sizing guide. For numbers 3 and 8, we visualize 2 clocks, a high-clock above and a low-clock below. - S-33 LH Oblique Clocks for Cursive - Student
The several clocks of various sizes show directions, relations of letter-parts, and shaping for the left-handed student. The clock is NOT a sizing tool. Visualize clocks in any size, from a tiny clock to a large clock. Sometimes it applies to a curve on the tall letter, like “f” or guide in shaping the tail-curve on letters like “g” or “j.” The clock application depends on the size of writing and the part of the circle needed. Sometimes the size must be larger as on certain capital letters or smaller as on the tops of loop letters or on the lower ends of tails. One clock sits above the other, on the slant, for 3 and 8. These oblique clocks are specifically for left-handed cursive. - S-34 Transitional Handwriting Sheet
Make several copies of these–one for the teacher and one every student. At this step do not focus on correctly slanting cursive. Write over manuscript to compare them. See the similarities and differences between manuscript and cursive. The sizing and general shaping of the letters have many similarities. But tails, loops, and connectors vary. After this transition, focus on cursive. - S-35 Connecting Strokes, Right- Handed
These are samples of the most commonly used right-handed connecting strokes. Students practice naming and writing each stroke. This prepares the way for easy oral instruction. - S-36 Connecting Strokes, Left-Handed
These are samples of the most commonly used right-handed connecting strokes. Students practice naming and writing each stroke. This prepares the way for easy oral instruction. - S-37 Pencil and Paper Hold Illustrations
Pictures of children, and hands, holding the paper and pencil or chalk correctly. The pencil hold is very important for ease in writing. The awkward ways children contrive to hold a pencil often keeps them from enjoying handwriting. Early efforts to promote a correct hold are kind. Other related dangers are poor posture, wrong paper hold, and the poorly sized chairs, and tables or desks.
KT-1-04 Set of 3 Readers, Perfect Bound with Silk Laminate Covers
The three colorful readers in primary colors are shrink-wrapped. Their cheerful 6 x 9 inch covers show pictures of young children reading. The stories are in large print and the inside pages are illustrated in black and white. The beautiful, original artwork helps children comprehend the story and gives a spring-board for its discussion. Bible words are used exclusively for the stories, and the sentences are so arranged that memorizing Genesis 1 will not enable the student to so easily “read” by simply memorizing a few repetitive phrases.
The theme of all three readers is the first week of this earth’s history. After reading the story from the Reader, the student reads the same story directly from the KJV Bible. The first reader provides a synopsis for the teacher of how to teach this unique approach. (The Teachers’ Guides give more detailed instructions.) A small-sized music score of The Song of Creation in the First Reader, gives students an opportunity to follow notes and read syllabicated words. Progress Checklists guide teachers and students to keep all instruction and exercises in the correct sequence to ensure success. The Progress and Memory Sequence Checklists are found in the Special Instruction Sheets.
Too often, parents and teachers are in a hurry to help a child read immediately by sight recognition of whole words, before the needed tools as supplied that give understanding. This is unwise and has an adverse effect. No child is asked, pressed, nor expected, to read any word that he has not previously written and studied. When he cannot remember a word that he has been taught, the phonogram and spelling rule tools, that precede the lesson, are applied and enable him to decipher it on his own. Keep the steps in order by the instructions, and it will be successful.
These readers are built on the first-mention of every Bible word in the passage. When correctly and sequentially followed, every willing student will learn to read. If you adapt and over-simplify the lessons to the popular sight-word method, we offer no guarantee of satisfactory results and students may become discouraged. Do not let him miss learning the rules and principles well. These will be a life-long treasure and ready resource if he learns them.
- R-1 In The Beginning, First Reader, Red
The first day of creation week is given in short, repetitive stories in large print. The 49 page, 6 x 9 inch book is illustrated inside profusely. Progress and Memory Sequence Checklists, Words to the Teacher, Summaries of the Words and Phonograms, and The Song of Creation, are included within its pages. The first reader has 8 lessons. - R-2 From Firmament to Seasons, Second Reader, Yellow
This 6 x 9 inch Reader is illustrated in black and white inside, and includes days two through four of Creation Week. The vocabulary builds on that of the First and Second Reader. A Progress Checklist, a Summary List of the words, and the Phonograms used in this Reader, are included in its 51 pages. The second reader has 12 lessons. - R-3 Abundantly Blessed, Third Reader, Blue
The Third Reader is 6 x 9 inches and teaches a larger vocabulary than the first two readers and builds on the First and Second Reader’s vocabularies. It includes the story of days-five-through-seven of Creation Week. A Progress Checklist, Word List, and Phonograms taught in the book are included in its 52 pages. The third reader has 17 lessons.
KT-1-05 Numeral-Alphabet Phonogram Flashcards.
The set of 36 double-sided cards, 5 1/2 x 4 1/4 inches, are packed in a zip-lock bag.
The ten Numeral Flashcards are shown in book print on the front. On the backs, numeral names, three handwritten samples, and the quantity of the numeral in happy faces, are shown. Numerals are used for learning the numeral names and their amounts. They are needed for counting and the clock, and for numbering lessons and pages. It is important to know how and to write them correctly.
The twenty-six Alphabet Flashcards are used for phonogram instruction and drill. The cards are book print on the front. On the back are found the phonogram sound(s), sample words to illustrate each sound, and lowercase handwriting samples in three styles. These flashcards introduce the letters with their orderly sounds. They show three correct writing styles, and are used for recognition and speed drills. Alphabet letters make one to four sounds each. The sounds are listed in the order of their frequency of use and should be memorized in this order.
KT-1-06 Multi-Letter Phonogram Flashcards.
Set of 68 cards, 4 1/4 x 3 3/4 x 5/8 inches, are packaged in a zip-lock bag. These cards are used to introduce the Multi-Letter Basic Phonograms (44) and the Advanced Phonograms (25). Some of the Advanced Phonograms have identical spellings to an Alphabet or a Basic Multi-Letter Phonogram. The back of the card tells the sound(s) of each Multi-letter Phonogram, its phrase where applicable, and examples of words containing the sound(s). The spelling origin is sometimes given (Greek, French, Old English). Multi-letter phonograms make one to six sounds each. Flash card drills are designed for gaining and maintaining speed. On the cards, the sound(s) that each letter-group makes is listed in the order of frequency of use–it’s scientific order. From when first introduced, all the sounds for a particular phonogram should be repeated and memorized in the order given.
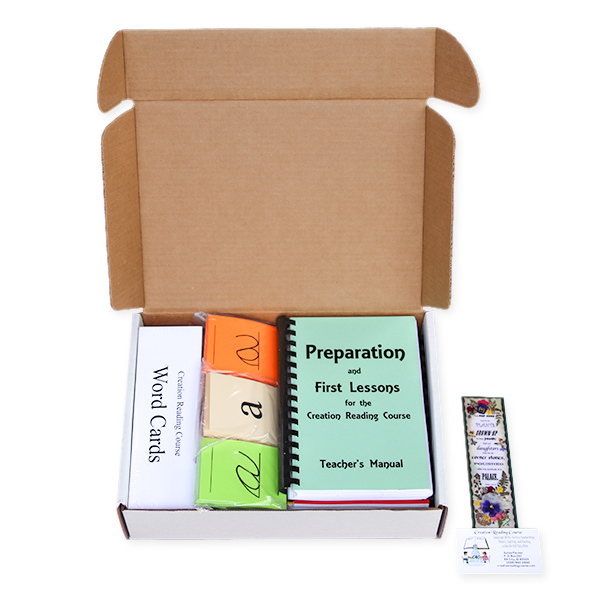
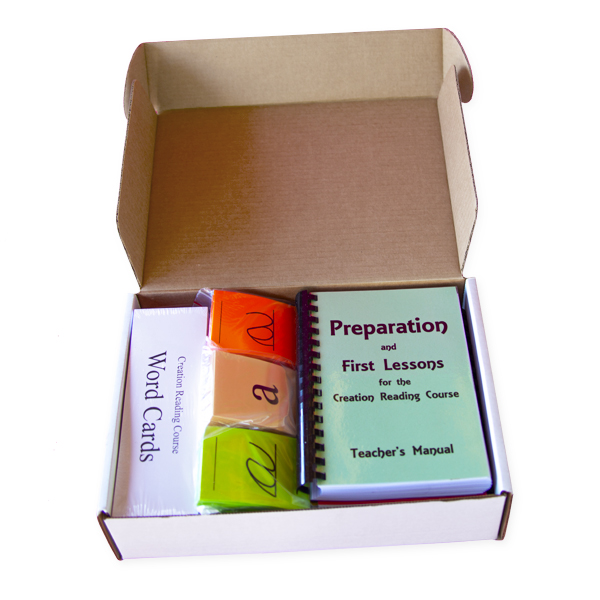
KT-1-07 Word Cards for the CRC.
The set of 161 cards, 8 ½ x 2 3/4 x 1 5/8 inches, are shrink-wrapped. These convenient word cards are double-sided with Syllabication and Analysis Markings. Root words, Homophones, Derivatives, Easily Confused words, and the Spelling Rule(s) that apply to that word, are given on the card. The Word Flashcards are used for word study and quick recognition drills before reading lessons. The teacher uses them for introducing the words for each lesson.
KT-1-08 Teacher’s Preparation Manual, Green Cover. Comb Bound.
Preparation for the Creation Reading Course and First Lessons, Teacher’s Manual. This manual, sized 8 ½ x 5 ½ x 1 inches, contains the broad principles and philosophy for this unique approach and a detailed description of the method. The Manual has explanations and instructions for the child’s first oral and written lessons. Many of these ideally begin with the baby, or even prenatally. These lessons must precede his reading lessons.
The Preparation Manual is most essential for the prospective teacher to study before attempting to teach the course. The information will be used from beginning to end in following the sequential, streamlined approach. Many find the new principles difficult to absorb in only one reading. Plan on reading it at least twice and use if for reference while teaching.
It includes tips for obedience, singing, memory work, good posture, speech, phonemic awareness, the beginner’s oral-hand-on math, scheduling suggestions, the classroom set up, lesson plans and how to keep records, singing and memory instructions, and how to teach handwriting.
The five Appendices contain several helps. The first gives Suggested Nature and Art Activities that coordinate with Creation Week. Use the Nature and Art Activities to keep your child busy, and to teach his hands and fingers many things about math, proportions, caretaking in details, and to create things he can enjoy or share. They will tend to develop an aptitude for useful skills. The second, is on School Entrance Age in the light of God's Word and common sense. The Third Appendix is a sample of approximately how the Student’s Notebook pages should appear for handwriting and word study in the main lessons. Appendix four lists the Phonogram sounds in the order of how-many-sounds each phonogram makes. The second section gives the varied Spellings for Phonemes, when they may be spelled in two or more ways. The fifth Appendix lists The 27 Spelling Rules.
This Manual is what the teacher most needs to study, diligently and before teaching, to learn the approach. He can then guide the child to find easy access to reading, without being harmed. If used according to the instructions and taught as soon as his development allows, he will not be pushed into reading prematurely, nor held back unduly while he develops wrong habits, but progress in harmony with his natural development. Balance the sedentary study for literary skills (up to one hour daily, depending on the child) with plenty of practical, oral, creative, and experimental learning. By using the broad educational resources of Useful work, Study of the Scriptures and of Nature, and the Experiences of Life, students may imitate the example of Christ, and receive a most valuable and balanced education without burn-out. Children learn quickly when they are facilitated with direct, daily lessons.
KT-1-09 Teachers’ Guides. Red, Yellow, Blue. Comb Bound
There are three Teacher Guides, 8 ½ x 5 ½ inches, corresponding to the three readers (ITB, FFS, and AB). The Guides follow the sequence of the Dialog Outline sheets. The Lesson Plans guide you in teaching the Multi-Letter phonograms, handwriting, word study, spelling, singing, memory work, and reading.
The child learns proper usage of the word and the definitions of Bible words. He is exposed to the parts of speech, homophones, root words, derivatives, easily confused words, and much more through oral instruction. The method is routine and dependable, but the words and applicable rules provide constantly vary, giving God’s deep thoughts to ponder, which promote a good character.
Bible verses are generally supplied for examples of word usage, when possible. Considered together, these Scriptures serve as a Biblical dictionary to reveal word meanings. Cursive handwriting is taught explicitly and remains central to the approach, which restrains dyslexia and promotes easy learning. The story of creation is eventually handwritten from dictation by the KJV Bible (not by glancing up and down to copy), phrase by phrase, or verse by verse, in coordination with the current reading lesson in Genesis.
Reviews and drills are contained in each lesson. The phonograms begin with the earliest preparation lessons and continue throughout the CRC, and should extend beyond. The Multi-Letter Phonograms ought to be indelibly impressed while studying the reading lessons and beyond.
- TGR-1 Teacher’s Guide, 1st Reader - In The Beginning Lessons, Red
This guide goes with the First Reader and contains detailed guidelines for teaching every multi-letter phonogram and for spelling every new word for these lessons. Teacher preparation is greatly facilitated by this guide. - TGY-2 Teacher’s Guide, 2nd Reader - From Firmament to Seasons Lessons, Yellow
The second Teacher’s Guide accompanies the Second CRC Reader. It continues with the same routines as the first Guide, according to the Dialog Outlines. It teaches every new phonogram and new word. Additionally, the phonograms, not needed in reading and spelling Genesis 1 - 2:3, are gradually introduced. All phonograms that have been previously learned should be drilled and taught when no new phonograms are called for in the reading lesson. - TGB-3 Teacher’s Guide, 3rd Reader - Abundantly Blessed Lessons, Blue
This third Teacher’s Guide accompanies the Third CRC Reader, giving a study routine for every new phonogram and new word. More Basic or Advanced phonograms are introduced when the lesson does not require any new phonogram. As a result, by the end of the reading course every phonogram, that we teach, has been introduced. With plenty of drill, these phonograms become common knowledge to every student. When this Guide is completed, the student is ready to progress to the First Sequel, When The Earth Was Young, Bible Speller-Reader. It is built on the vocabulary, phonics, and methods learned in the CRC. Without the foundational principles and vocabulary taught in the CRC, WTEWY cannot be effectively taught.
KT-1-10 Magnets of Lower-case Alphabets
There are three styles of lowercase magnets. The cards are 3 3/4 x 2 7/8 inches. Each set of 26 magnetic, laminated cards is packaged in a zip-lock bag. The three styles are Book print, Left-hand Cursive, and Right-handed Cursive. The magnets teach students the styles of letters used for handwriting and reading.
The magnets are used in many ways. Teach them by groups, and review them in ever-increasing numbers, until the whole visual alphabet is connected to its phonogram sounds. Students learn the lowercase forms of letters first as a means of preventing dyslexia. They learn the varying styles of each letter-- three lowercase styles by which the same sound may be pictured. Drill in alphabetical order, and in random order. Divide the letters into vowels and consonants. Let the child arrange them from chaos into alphabetical order. Match cursive forms to book print forms while saying the sounds.
Teach all the letter-sounds (phonemes) fairly fast, then give daily drills. Right-handed children need to use only 2 sets (book print and right-handed). Left-handed students need only 2 sets, but both orientations may practice reading the opposite cursive orientation from their own.
- M-1 Lowercase Book Print - for reading
Students use the 26 laminated, book print magnets primarily in reading, since most books are written in this style. Use the magnets to drill on the Alphabet Phonograms, singly, in groups, in alphabetical order, and in random order. Sort them into vowels and consonants. Students enjoy manipulating these laminated magnetic cards. - M-2 Lowercase Right-Handed orientation Cursive - for handwriting
These 26 laminated letter magnets are primarily for the right-handed student, but the left-handed child should also recognize and read them, matching them to the Book Print. - M-3 Lowercase Left-Handed orientation Cursive - for handwriting
These 26 laminated letter magnets are especially for the left-handed student, but the right-handed child should also recognize and read them, matching them to the Book Print and Right-Handed Cursive magnets.
KT-1-11 Punctuation Marks Flashcards.
Thirteen punctuation cards, 3 3/4 x 2 7/8 inches, with their names on the back, are used to drill on the names of the marks. Packaged in a zip-lock bag.
The Punctuation Rules (6 pages on white paper), explain each Punctuation Mark, and are in the Special Instruction Sheets package. Punctuation Cards and the Punctuation Rules are used together and required from the First Reader lesson and ever after. When a punctuation mark is required, the student should be taught how to stroke and place it by the guidelines. He should be taught the rules and questioned regarding punctuation in the stories and in the Bible, until the rules are mastered.
KT-1-12 Numeral and Alphabet Stroking Cards
Five of these sets, the Numerals and Lowercase Stroking Cards, are 3 3/4 x 2 7/8 inch cards. Three of the sets, the Capital Letter Stroking Cards, are 4 1/4 x 3 3/4 inch cards. The letter sample is shown on the front of the card and stroking instruction is on the back. To keep the emphasis where it ought to be-- on the lowercase letters first, which is important in remedying or preventing dyslexia,-- do NOT teach the capital letters during early lessons, but only as required. Teaching all the capital letters is reserved until in the Second Reader, when time is specifically designated for the purpose. The teacher reads the guidance while he writes a sample on the board. Right-handed and left-handed students may be instructed simultaneously in a classroom setting, but the teacher must write a sample of the letter in both orientations. When a student shows that he can stroke the letter correctly and give the oral instructions, then he is able to write it correctly and independently. However, use manuscript, lowercase and capitals, only briefly so that manuscript does NOT become the student's reflexive handwriting. Manuscript is a short step toward the goal-- beautiful, swinging, cursive handwriting.
- NS-1 Numeral Stoking Cards.
There are two sets of 3 3/4 x 2 7/8 inches Numeral Stroking Cards. These are for Right-Handed and Left-handed students. (The Manuscript Numeral stroking instructions are given only in the Teacher’s Manual as a short step toward cursive. The difference between Manuscript Numerals (vertical, round, and blocky-- rectangle model) and Cursive Numerals (slanted, oblique, and elongated-- parallelogram model) is the easy, swinging slant and narrower shape of the cursive. Stroking is identical for all the numerals otherwise. Writing by oral directions is better than copying because the student avoids having to glance up while writing, which breaks up continuity of focus and compromises handwriting quality. With these directions kept in mind, every student can tell himself how to stroke correctly. - NS-2 Right-Handed Cursive Numeral Stroking Cards
The right-handed cursive numeral stroking is taught in the early handwriting lessons, immediately after manuscript lessons and a few other exercises. For teaching right-handed students. The cards are 3 3/4 x 2 7/8 inches. - NS-3 Left-Handed Cursive Numeral Stroking Cards
The teacher’s left-handed cursive numeral stroking cards are used early in the handwriting lessons, immediately after manuscript lessons and a few other exercises. For teaching left-handed students. The cards are 3 3/4 x 2 7/8 inches. - AS-1 Alphabet Stroking Cards.
The three sets of Lowercase Alphabet Stroking cards are sized 3 3/4 x 2 7/8 inches. The three sets of Capital Alphabet Stroking cards are 4 x 3 3/4 inches. Cards are easier to hold than a book. These six sets of cards are for the teacher’s convenience when giving oral directions for manuscript or cursive. The first required use of capital letters in manuscript is to spell the child’s first name. A capital "L" may also be needed for titling his earliest lessons. Do NOT teach capital letters before lowercase letters. - AS-2 Lowercase Manuscript Stroking Cards
Manuscript stroking cards are used in the earliest handwriting lessons by the teacher in giving oral stroking directions to the students. - AS-3 Lowercase Right-Handed Cursive Stroking Cards
Right-handed Cursive stroking cards are used in the early handwriting lessons by the teacher in giving oral stroking directions to the students. - AS-4 Lowercase Left-Handed Cursive Stroking Cards
Left-handed Cursive stroking cards are used in the early handwriting lessons by the teacher in giving oral stroking directions to the students. - AS-5 Capital Manuscript Stroking Cards
Capital Manuscript Stroking Cards give directions for how to write all the capital manuscript letters. During the Second Reader, all the Manuscript Capitals should be taught. - AS-6 Capital Right-Handed Cursive Stroking Cards
Right-Handed Capital Stroking Cards are used by the teacher for oral instructions, only as needed during the beginning handwriting lessons and through the First Reader lessons. During the Second Reader lessons, the teacher schedules a time and takes a break in the routine, to teach all the right-handed cursive capital letters that are not already well known, one letter at a time, to the right-handed students. - AS-7 Capital Left-Handed Cursive Stroking Cards
Left-Handed Capital Stroking Cards are used for giving oral directions, only when a capital is required during the beginning handwriting lessons and through the First Reader lessons. During the Second Reader lessons, the teacher schedules in time to teach all of the left-handed cursive capitals to the left-handed students.
KT-1-13 Labeled CRC Kit Box, 10 x 12 x 3 inches.
Corrugated Cardboard box with closing lid and Creation Reading Course Kit label.
Additional information
| Dimensions | 10 × 12 × 3 cm |
|---|

Reviews
There are no reviews yet.