A Set of 37 Special Instruction Sheets
$28.00
Unbound pages are 8 ½ x 11 inches and presented in a plastic slip cover. Always preserve a clean master copy of each of these master sheets. Following is a list and description of each of the Special Instruction Sheets.
The instructive, unbound master pages, 8 ½ x 11 inch, are presented in a plastic slip cover. Copy the desired pages, then punch and bind them in a looseleaf notebook. The Special Instruction Sheets contain dialog outlines, the summary of phonograms, progress check lists, a memory sequence checklist, alphabet charts, weekly plans and records, spelling rules, capitalization and punctuation rules, a marking guide for word analysis, handwriting guides which include slant sheets, clocks, connecting strokes, and more, as listed below.
Pictures are purposely not used in teaching the phonograms or handwriting. The letters themselves are the pictures of the phonograms! The Special Instruction Sheets may be duplicated by the buyer for his/her family or class, as needed. Remember to always preserve a clean master copy of each sheet. Following is the list of sheets.
- S-01 Phonogram Lowercase Alphabet Chart
This chart is in lowercase book print for drilling on saying the alphabet sequentially as a rhyme and as in reading. - S-02 Manuscript Handwriting Alphabet Chart, Capital and Lowercase
Handwritten manuscript letters, in capitals and lowercase– mother and baby manuscript letters. - S-03 Right-handed Cursive Alphabet Chart, Capital and Lowercase
A slanted, handwritten cursive alphabet chart which matches capitals and lowercase letters for the right-handed. - S-04 Left-handed Cursive Alphabet Chart, Capital and Lowercase
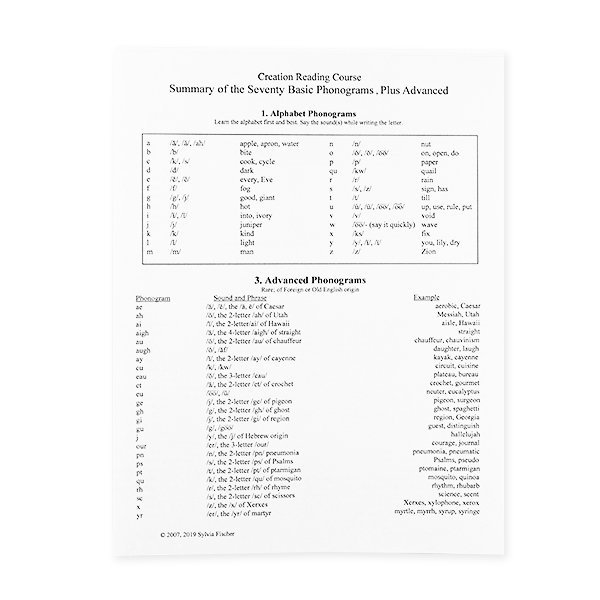
A slanted, handwritten cursive alphabet chart which matches capitals and lowercase letters for the left-handed. - S-05 Summary of Phonograms, Alphabet, Basic Multi-letter, Advanced
A chart that summarizes all the phonograms taught in the CRC in three groupings: (1) Alphabet (2) Basic Multi-Letter (3) Advanced. The Alphabet Phonograms should be learned first and most thoroughly with three styles of letters in lowercase–book print, manuscript, and cursive. The Basic Multi-Letter should be learned next in lowercase, (3) and the Advanced last, which are the least used in our language are learned when needed, or a little later. - S-06 14 Capitalization Rules
These fourteen rules are taught whenever a capital letter is needed in writing or reading. Be sure to always tell WHY we need a capital letter, otherwise it is written in lowercase. - S-07 27 Spelling Rules
The 27 Spelling Rules guide us in lawfully combining the English phonograms. Spelling rules are an important guide for correct spelling and analysis of words. - S-08 47 Punctuation Rules
Punctuation rules are taught when the First Reader is begun and ever after. Students deserve to know WHY punctuation is required. These rules go hand-in-hand with the Punctuation Flashcards. - S-09 Word Analysis Marking Guide
Analysis of each spelling word is an effective device whereby students remember how the word is spelled. - S-10 Numeral and Alphabet Phonogram Dialog Outlines
When teaching how to write each and every numeral and alphabet letter, the teacher follows this outline to ensure complete and thorough instruction. - S-11 Multi-Letter Phonogram and Spelling Dialog Outlines
When teaching how to write each and every multi-letter phonogram and spelling word, the teacher follows this outline to ensure complete and thorough instruction. - S-12 First Reader Progress Check List, In The Beginning
Our Primer for the Creation Reading Course begins with no background words. Be careful to keep instruction in order for every student with this Progress Check List. - S-13 Second Reader Progress Check List, From Firmament to Seasons
The Second Reader Progress Check list will lead the student safely along if they did thorough work on the first one. When well taught children are successful and most seem catch on to “how reading works” early during this Reader, if not before. - S-14 Third Reader Progress Check List, Abundantly Blessed
The Third Reader Progress Check List is built on completion of the first two checklists. There are - S-15 Memory Checklist, Genesis 1- 2:3
This guides memory drills in a manner that helps the student learn the whole passage evenly and effectively. Don’t worry that he will forget the beginning portion while drilling on later portions. Memory drills are the ideal time to focus on meaning and thorough comprehension. - S-16 Weekly Planning Sheet
Plan for a balanced education with this planning sheet by learning something important in each area every day. It can be used to keep track of your subjects of study and adapted, in the fear of God, to fit your state requirements. - S-17 Weekly Record Sheet
Keep a record of each student’s accomplishments each week by category. Make color-coded markings of the state-required subjects and show that you are meeting these standards. - S-18 Handwriting Guidelines - Baseline, Upper, and Lower
Show how to place letters and name the guidelines for manuscript or cursive handwriting. This guide sheet applies to both hand orientations. - S-19 Primary Gray Sheet - Landscape
An early guide in the landscape orientation to show how tall, proportionally, all letters should be and how far down the tails hang. The small gray box at the beginning sits on the baseline and is the height that short letters should be. The next higher guideline is how tall the tall letters should be. The first line below the baseline is how long tails should be. It may be used with the vertical manuscript guidelines behind it, and with the slanted cursive guidelines, either right-handed or left-handed. This size is for the earliest handwriting lessons to make stroking and proportions very clear to the student’s mind. Decrease size to the 1st Gray Sheet soon. Gray sheets apply to both hand orientations. - S-20 1st Gray Sheet - Portrait
Use this smaller Gray Sheet in the same way as the Primary Gray Sheet to show the proportional placement and height and tail lengths of letters. This Gray Sheet is sized for the First Reader and for writing on every other line in a Primary sewn notebook. Gray sheets apply to both hand orientations. - S-21 2nd Gray Sheet - Portrait
This is the smallest size that students write for the CRC and beyond. It is the size for writing on every line in the Primary sewn notebook, beginning with the Second Reader. Tall letters should be about 2/3 of the way from the baseline to the upper guideline and tails hang about 1/3 of the way from the baseline to the lower guideline to prevent “tangling” and illegibility. Letters should also be decreased sideways, to maintain their oblique, parallelogram cursive forms. This is the size is our goal before the student’s mental template is set firmly. Take care to use sharp pencils to write in this size. Gray sheets apply to both hand orientations. - S-22 Vertical Guide Sheet - Landscape, Primary
Slip this guide sheet behind the Primary Gray Sheet to write the early manuscript handwriting. Press the Gray sheet page down so that you can see the vertical lines through it. The vertical Guide sheet applies to both hand orientations. - S-23 Vertical Guide Sheet - Portrait
Slip this guide sheet behind the sewn notebook sheet page. It is a faintly-seen guide to keep the downstrokes vertical for early manuscript handwriting. This vertical Guide sheet applies to both hand orientations. - S-24 RH Slant Sheet for Cursive, Primary - Landscape
Slip this guide sheet behind the Primary gray sheet for a faintly-seen guide to follow in writing the large-size beginner’s cursive alphabet letters and numerals. This guide sheet is for right-handed students only. - S-25 LH Slant Sheet for Cursive, Primary - Landscape
Slip this guide sheet behind the Primary sewn notebook page as a faint guide for the left-handed beginner’s cursive handwriting slant. - S-26 RH Slant Sheet for Cursive - Portrait
Slip this guide sheet behind the sewn notebook page as a faint guide for the right-handed cursive handwriting during the handwriting introduction and through the Third Reader, before and after the writing size decreases. - S-27 LH Slant Sheet for Cursive - Portrait
Slip this guide sheet behind the sewn notebook page as a faint guide for the left-handed cursive handwriting during the handwriting introduction and through the Third Reader, before and after the writing size decreases. - S-28 Round Clock for Manuscript - Large
The teacher’s right-handed guide-clock for the front of the classroom. Used for instruction in manuscript stroking directions and shaping for both numerals and letters. Clocks are NOT a sizing guide. - S-29 Round Clocks for Manuscript - Student
Several clocks of various sizes show directions, relations of letter-parts, and shaping. The clock is NOT a sizing tool. It can be visualized in any size, from a tiny clock to a large clock. The size all depends on the application. Sometimes it applies to a curve on the tall letter, like “f” or guide in shaping the tail-curve on letters like “g” or “j.” The clock size depends on the size of writing and the part of the circle needed. Sometimes the size must be larger, as in capital “C” or capital “G,” or smaller as on “e,” “s,” and “m.” These clocks serve both right-handed and left-handed students - S-30 RH Oblique Clock for Cursive - Large
The teacher’s guide-clock for the front of the classroom for right-handed cursive instruction. Used for cursive stroking directions and shaping for both numerals and letters. It is NOT a sizing guide. For numbers 3 and 8, we visualize 2 clocks, a high-clock above the a low-clock below. - S-31 RH Oblique Clocks for Cursive - Student
The several clocks of various sizes show directions, relations of letter-parts, and shaping. The clock is NOT a sizing tool. It can be visualized in any size, from a tiny clock to a large clock. The size chosen depends on the application. Sometimes it applies to a curve on the tall letter, like “f” and guides in shaping the tail-curve on letters like “j.” The clock size depends on the size of writing and on whether a part if a circle, or the whole circle, is needed. Sometimes the size must be larger, as in capital “C” or capital “G,” or smaller as on “e,” “s,” and “m.” One clock sits above the other, on the slant, for the numerals 3 and 8. These oblique clocks are specifically for the right-handed. - S-32 LH Oblique Clock for Cursive - Large
The teacher’s guide-clock for the front of the classroom for left-handed cursive instruction. Used for cursive stroking directions and shaping for both numerals and letters. It is NOT a sizing guide. For numbers 3 and 8, we visualize 2 clocks, a high-clock above the a low-clock below. - S-33 LH Oblique Clocks for Cursive - Student
The several clocks of various sizes show directions, relations of letter-parts, and shaping for the left-handed student. The clock is NOT a sizing tool. Visualize clocks in any size, from a tiny clock to a large clock. Sometimes it applies to a curve on the tall letter, like “f” or guide in shaping the tail-curve on letters like “g” or “j.” The clock application depends on the size of writing and the part of the circle needed. Sometimes the size must be larger as on certain capital letters or smaller as on the tops of loop letters or on the lower ends of tails. One clock sits above the other, on the slant, for 3 and 8. These oblique clocks are specifically for left-handed cursive. - S-34 Transitional Handwriting Sheet
Make several copies of these–one for the teacher and every student. At this step do not focus on correctly slanting cursive. Write over manuscript to compare them. See the similarities and differences between manuscript and cursive. The sizing and general shaping of the letters have many similarities. But tails, loops, and connectors vary. After this transition, focus on cursive. - S-35 Connecting Strokes, Right- Handed
These are samples of the right-handed connecting strokes which are most commonly used. Students practice naming and writing each stroke. This prepares the way for easy oral instruction. - S-36 Connecting Strokes, Left-Handed
These are samples of the left-handed connecting strokes which are most commonly used. Students practice naming and writing each stroke. This prepares the way for easy oral instruction. - S-37 Pencil and Paper Hold Illustrations
Pictures of children, and hands, holding the paper and pencil or chalk correctly. The pencil hold is very important for ease in writing. The awkward ways children contrive to hold a pencil often keeps them from enjoying handwriting. Early efforts to promote a correct hold are kind. Other related dangers are poor posture, wrong paper hold, and the poorly sized chairs, and tables or desks.
Reviews
There are no reviews yet.